Official Manual · First Connection
Shadowrocket Setup GuideImport servers, connect, and route traffic
First, connect successfully to one existing server, then check whether the rules work as expected. The steps below use the iPhone / iPad interface and follow a five-step sequence. You do not need to change every setting before connecting for the first time.
Identify the information you have
Add Server: Add a server or import a subscription
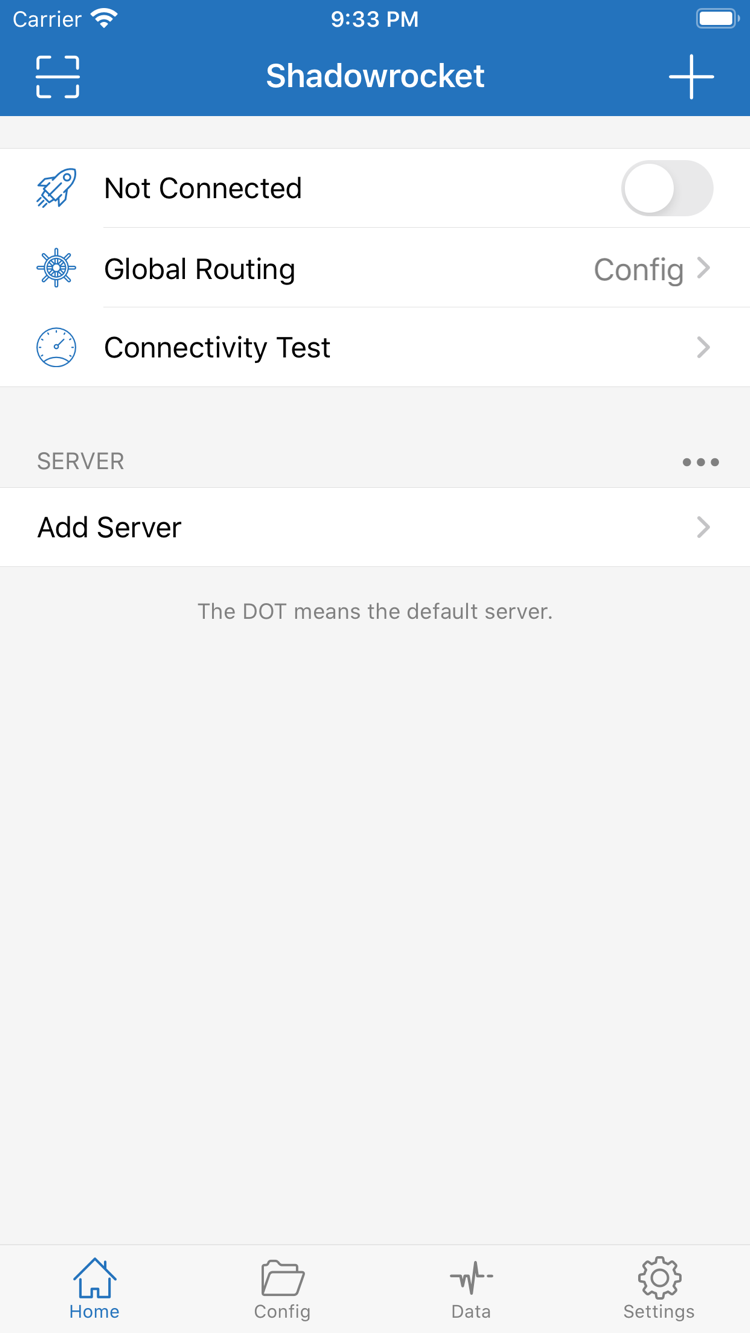
Open Shadowrocket and stay on Home. SERVER below is where you view and select servers. Before using the connection switch for the first time, add your own details to the list. A subscription URL, a single-server share link, and a configuration file serve different purposes; do not treat them as interchangeable just because they can all be copied as text. Check whether your information describes an update URL for a group of servers or connection details for a single server, then choose the appropriate import method below.
Have a subscription link? Select Subscribe
Open Add Server from Home, select Subscribe under Type, then return to the form and paste the complete subscription URL into the URL field. Use the remark field to identify the server group with a name that is easy for you to recognize. Before saving, check that the URL has no leading or trailing spaces, line breaks, or explanatory text copied from a message. Parameters in the URL are part of the complete link: do not keep only the path before the question mark or replace authentication parameters with example text.
After saving, return to Home and wait for the subscription contents to load. Check whether the corresponding group and server entries appear under SERVER. Saving a subscription name without any servers does not mean the import succeeded; check the subscription update result before continuing. To get future changes to this group of servers, update the existing Subscribe entry rather than repeatedly adding the same URL. Subscription links often contain access credentials, so protect them in screenshots, support requests, and backups.
Have details for one server? Fill in the fields for its Type
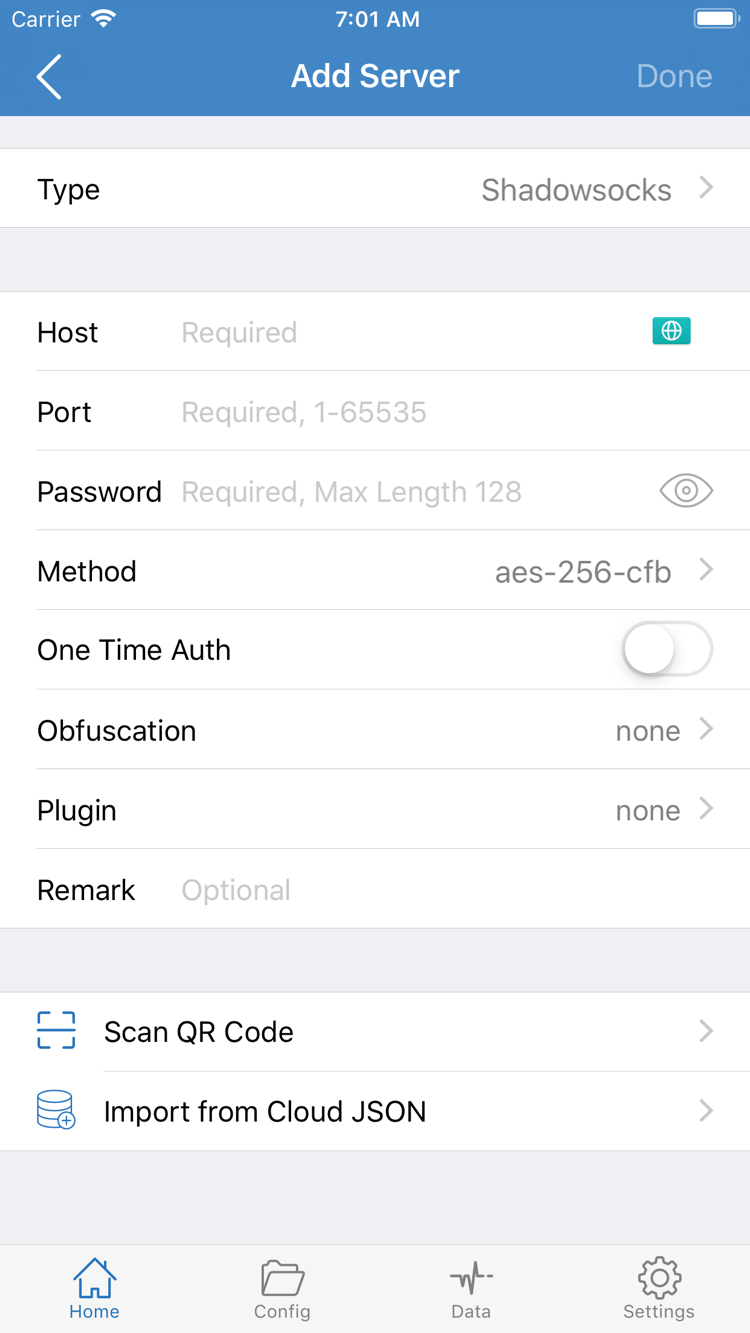
If you have a server address, port, and authentication details, select the Type that matches the information in Add Server. For example, with Shadowsocks, check Host, Port, Password, and Method one by one. Fields for other protocols vary by Type, so fill them in using the original details. Host is the server hostname or IP address; do not add a web page path. Port must match the supplied details, and Password and Method should not be guessed. Selecting the wrong protocol can prevent a connection even when the address and password appear correct.
If you have a QR code, use Scan QR Code to import it and allow camera access when prompted by the system. If you have a single-server share link, copy it and return to the app, then review the contents as prompted. After importing, check that Type, Host, and Port match the original details. Import from Cloud JSON is a separate structured import option; do not use a regular subscription URL as JSON. For your first connection, use one suitable import method rather than trying every option.
Completion check: A recognizable server appears under SERVER on Home. Tap the entry you want to use and confirm that it is selected. Remember its name, as you will keep it selected when choosing Global Routing in the next step. For details on organizing multiple subscriptions, update strategies, and deleting backups, see the subscription and server management manual.
Choose how traffic is handled
Global Routing: Choose a routing mode
Once a server has been added, return to Home and tap Global Routing to view the current mode. This controls how traffic is handled; it does not fill in missing server details. For everyday routing that separates proxy and direct connections according to a configuration file, use Config. To temporarily check whether the selected server can reach a destination, compare results using Proxy. To connect directly to a destination, use Direct. These are three modes, not three different servers or speed tiers.
| Mode | Meaning and use |
|---|---|
| Config | Handles traffic according to the rules and policies in the current configuration file. Suitable for everyday rule-based routing. |
| Proxy | Sends traffic through the proxy path, for situations that specifically require a proxy or for temporary comparisons. |
| Direct | Connects traffic directly to the destination, useful for checking access over the current network. |
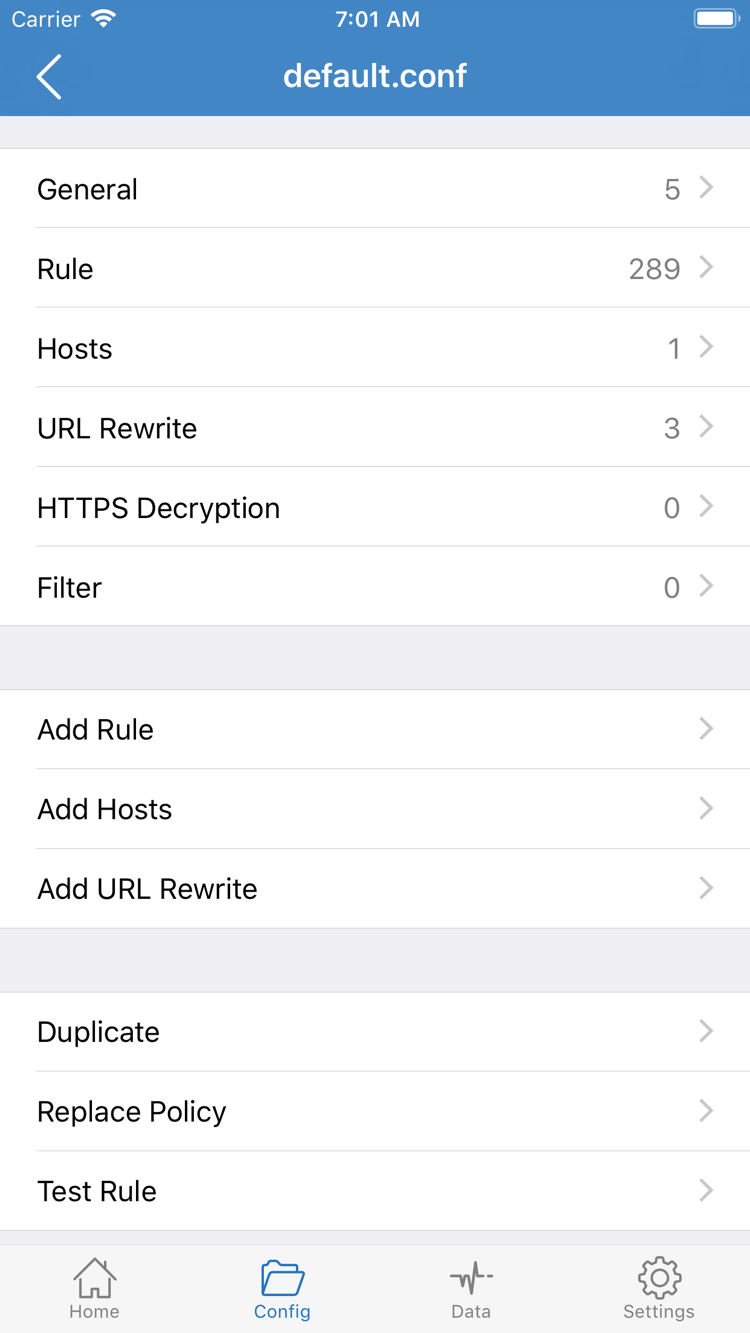
After selecting Config, open Config and confirm that the configuration file you intend to use is enabled. Subscribe manages the server list; Config manages configuration. Successfully importing a subscription does not mean that rules suitable for every destination have been provided automatically. Open a configuration file to view sections such as General, Rule, Hosts, URL Rewrite, and HTTPS Decryption. Before your first connection, just check the active configuration and the intent of the rules in Rule. Do not enable rewriting or decryption features just to follow this guide.
The three lines below are only to illustrate rule order; they are not instructions to replace your existing configuration. DOMAIN-SUFFIX matches a target domain suffix, GEOIP matches based on the destination IP's region, and FINAL handles traffic that did not match earlier rules. Rules are generally checked from top to bottom, so a broad rule placed first may match before a more specific one. PROXY and DIRECT are policy names. If your configuration uses custom policy groups, confirm that the names referenced by its rules exist.
DOMAIN-SUFFIX,example.com,PROXY
GEOIP,CN,DIRECT
FINAL,PROXY
Add Rule in the screenshot is the option for adding a rule, but you do not need to add one before your first connection. First connect and verify using the existing configuration. If a destination takes an unexpected route, then adjust the relevant rule. Keep the original configuration before making changes, and change only one thing while testing so you can restore it easily. See the settings manual for more information on settings. The verification section below explains how to check whether the mode and rules are working as expected.
Completion check: Home displays the intended Global Routing mode. If you selected Config, a configuration file is also explicitly enabled in Config. Next, return to Home and connect. Do not add more rule changes before verifying the server.
Authorize the system connection
Home: Turn on the connection
Return to Home and check which entry is selected under SERVER. If the list has several servers, seeing a server name does not mean it is selected. Tap the entry you want to use, then check Global Routing. If the top of the screen shows Not Connected, there is no current connection. When ready, turn on the switch at the top and wait for the system or app to respond. Avoid toggling it repeatedly, which makes the current state harder to identify.
On your first connection, the system asks for permission to add a VPN configuration. Confirm the prompt is from Shadowrocket, then follow the system steps to allow it and complete any required passcode or biometric authentication. This system permission lets the client handle the relevant network traffic; it is not part of importing a subscription. If you previously cancelled authorization, the server list may remain, but the top switch cannot establish a connection. Start connecting again and complete authorization instead of importing the same subscription again.
After authorization, return to Home and check whether the status at the top has changed from Not Connected. Keep the connection on. The system interface may also show a VPN indicator, but that only helps confirm that the network tunnel is enabled; it does not prove that the remote server is available or that every destination is using the correct policy. Keep the current server and mode unchanged and continue to the next step to verify access.
If the switch turns off again immediately, note the message. Check whether authorization is complete, whether another VPN connection is active, and whether you selected an entry with incomplete details. To resolve a connection conflict, leave only the connection you are testing enabled and try again. Do not change the network, server, mode, and configuration all at once; even if the connection succeeds, you will not know which change made the difference.
Completion check: The app's connection status has changed and does not disconnect immediately. Do not enable On Demand yet. Set up automatic connection only after the manual connection is stable, so it does not restart automatically while you are troubleshooting.
Check connection status and access separately
Connectivity Test: Verify the setup
Once connected, use Connectivity Test on Home to check whether the server is reachable. Interpret the result in the context of the test method: a response means that the test received a response under those conditions; it does not mean that every website, protocol, or time of day will work the same way. If an entry times out, check it against actual access and the test method before drawing conclusions. Do not keep switching servers based on a single test value in the list.
Next, open a browser and visit the destination you intend to use. Wait for the page to finish loading, then try a normal action, such as opening another page on the same site. To reduce the effect of cached content, refresh the page or test again in a new browsing session. For the first verification, use the same destination, network, and server. Seeing a page title or a system VPN indicator alone is not enough to confirm that access is working properly.
If you use Config, distinguish between “can access” and “routed correctly.” Check the relevant connection records in Data and use the destination domain, matched rule, and policy to determine the actual route. Access expected to use a proxy should show PROXY or your own proxy policy group; access expected to connect directly should show DIRECT. A DIRECT record is not necessarily a fault; it may be the intended result of the rule. Conversely, a successful visit may have worked through a direct connection, so it does not prove that the proxy server has been verified.
If a destination works in Proxy but fails in Config, first check the rule match, policy name, and destination resolution in Config. If both modes fail, check the server fields and current network again. Direct can be used to compare access to the destination over the current network, but differences between routes are diagnostic clues, not proof that a component is damaged. Restore your original mode after the comparison.
You can now keep the current settings and use the app. If you need automatic connections, configure conditions in On Demand later, then test both when the conditions trigger and what happens when they stop applying. Adding more rules, organizing multiple subscriptions, and adjusting update strategies are later management tasks. See the subscription and server management manual; you do not need to do everything before making your first connection.
Change one condition at a time
Settings: Troubleshoot common issues
First identify where the failure occurs: a subscription cannot be retrieved, no server is selected, the connection switch will not stay on, or a destination cannot be accessed after connecting. Each symptom points to a different place to check. Note your current network, server, Global Routing mode, and any message, then review the items below in order. After changing one item, test the same destination again. If there is no improvement, restore the original value so you do not disrupt settings that were working.
Subscribe update fails or no servers appear
First check that you copied the complete subscription URL, not an ordinary web link that opens a management page. Make sure it has no spaces, line breaks, or truncated parameters, then check whether the current network can access the internet normally. Subscription URL validity and successful client installation are separate issues. An expired URL, changed authentication requirements, or an unexpected response format can all prevent the list from updating. If you need to verify the URL, contact the provider of the service you already use. Do not post a complete URL containing credentials publicly.
Connection fails or Connectivity Test times out
For a manually added entry, check Type, Host, Port, and authentication fields first. If TLS or other transport options are present, follow the original details; do not disable verification just to see if it connects. Then confirm that system authorization is complete and compare the same entry over another network you can use. If only the test result seems unusual, check Test Method in Settings and confirm that the method and target suit the current connection. After changing the test method, check actual access too rather than comparing display results alone.
Connected, but pages do not load or some destinations fail
As described in the previous section, briefly compare Proxy and Config. If only Config fails, check the active file and the rule order in Rule. If multiple destinations fail, check the server and network again. DNS resolution problems can also prevent a page from opening; use the connection records to see whether a destination address was obtained. Do not add many domain rules without a clear reason, or assume that every failure is caused by a subscription update.
The switch changes by itself or you need diagnostic information
Check in Settings whether On Demand is enabled and whether its trigger conditions match the current network. While troubleshooting, pause automatic triggers and reproduce the issue using the manual switch. Once the baseline works, restore conditions one at a time. If you need to investigate further, use Diagnostics to collect information, including when the problem occurred, the error message, and steps to reproduce it. Before sharing diagnostic records, hide subscription URLs, authentication parameters, and personal browsing information. Share only what is needed to troubleshoot.
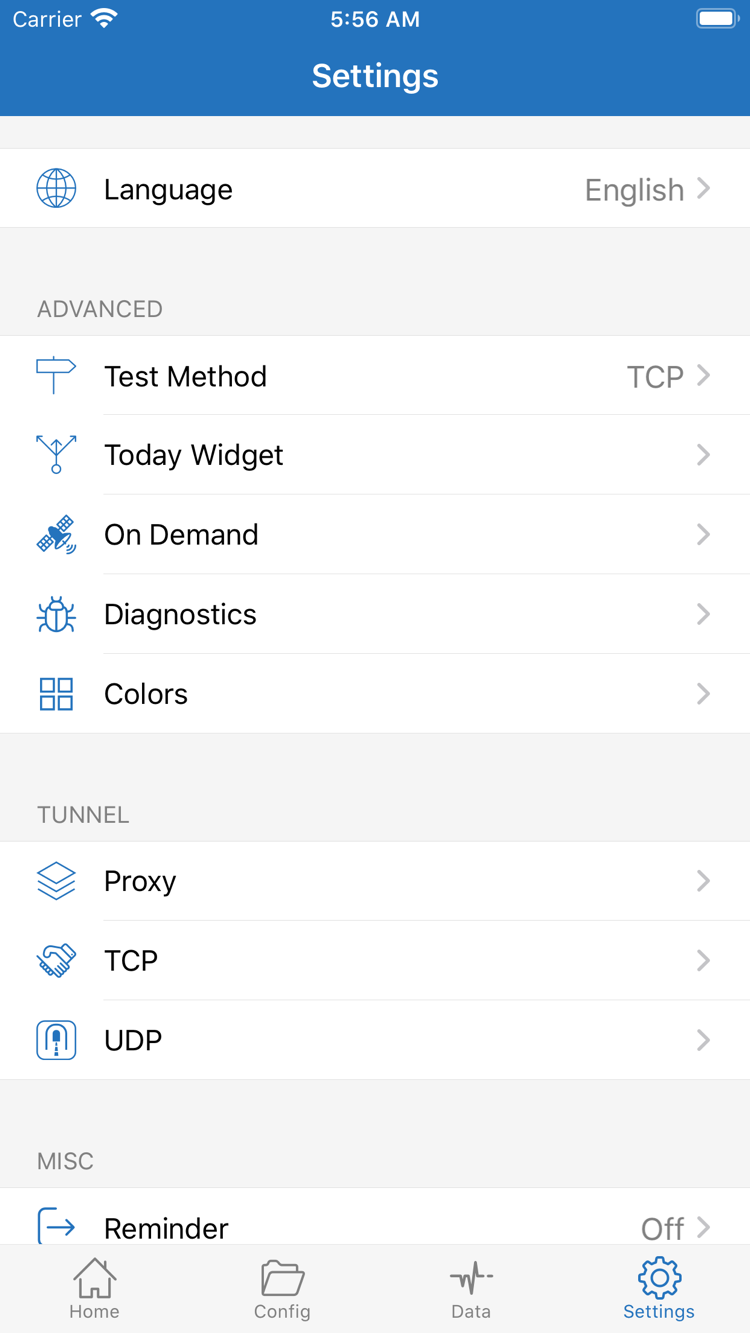
Settings may also include options such as Proxy, TCP, and UDP. These are not a checklist of changes required for your first connection, so do not switch them randomly just because a destination fails. If the issue still occurs after restoring the original configuration, consult the settings guide with a clear description of the symptom. For subscription groups, server fields, or update management, continue with the server management manual.
Completion check: You can identify the step where the problem occurs, the conditions already tested, and what you will check next. Keeping a restorable configuration and changing one item at a time helps narrow down the cause more effectively than repeatedly deleting and reinstalling.